
Thursday, October 4, 2012
The race to teethe is on.
Oh what a few weeks its been with my 9 month old daughter Ava who has all of a sudden sprouted 4 teeth in the span of a week! Of course its been the usual for any baby who is teething: crying, clingy, and of course not sleeping. Its not that I didn't expect something like this - my 2 year old popped two teeth at once at 9 months and then another two a few weeks later. But, the four at once really came as a surprise and a grumpy one at that (for everyone). Well here we are a week later and I was hoping we would get a little break from the the teething monster, but alas....after a night of Ava waking up no less then 10 times to comfort nurse only to start crying because it hurt too much to nurse, she is teething again. This morning I felt her gums to discover three more teeth trying to surface. Oy Vay! I know its a blessing to just go ahead and get the teething over with but I feel like we are going for a record here! Well it looks like she will be chewing meat sooner then expected - here's to a mouthful of teeth.
Wednesday, October 3, 2012
First Tutorial - Ruffle Minky Baby Blanket
I am so excited to share with you my very first tutorial. As you may know I make baby blankets - the soft cuddly kind with delicious Minky and sweet soft Satin. So while making one of these beautiful blankets for my best friend I decided this was the perfect chance to share this how to with all of you!

1 yard cotton or flannel fabric
1 yard Minky fabric
1 package Wrights Blanket Binding
1 package Dritz Wash Away Wonder Tape
Cutting Mat
Grid Ruler
Rotary Cutter
Walking Foot
Ruffler Foot *(Can be done without)
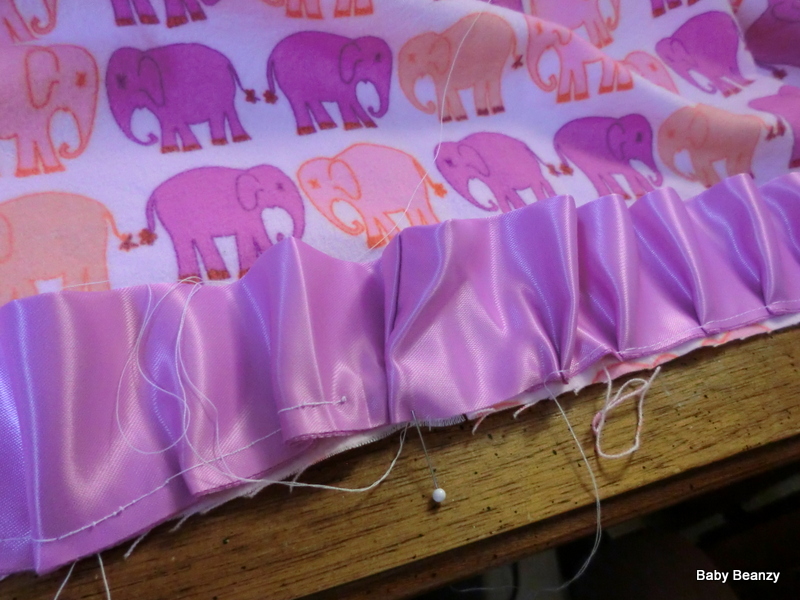
I like to start by ruffling my Blanket Binding first. The easiest way is to use a Ruffler Foot Attachment and simply feed the binding through. I set mine on the largest setting where it makes the deepest tucks every 12 stitches. I also set my stitch length to 4. If you don't have a Ruffler Foot that is ok, you can simply do the ruffles by hand and pin all the tucks.
 |
| The Ruffler Foot Attachment |
 |
| LOVE these Ruffles! |
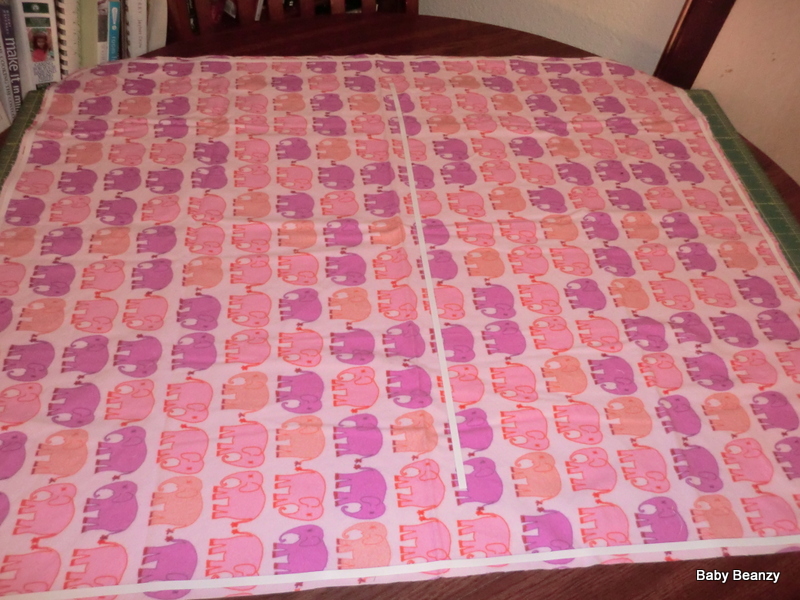
Then its time to start cutting the fabric for the blanket!
 |
| Selvage on the top of cutting mat and fold on the bottom |

Then fold the fabric in the opposite direction - so part that was just cut is now lining up together. Then lay the fabric back down on the cutting mat with the fold lined up on the bottom line and the just cut sides on top. Then cut so the blanket is 28 1/2 inches wide.

In the next step I take any round edge object and line it up on the corners (while still folded in half) and cut a round corner with my rotary blade.


I ABSOLUTELY LOVE Dritz Wash Away Wonder Tape - it makes working with Minky so much easier!
 |
| Dritz Wash Away Wonder Tape |
Then using my Dritz Wash Away Wonder Tape instead of pins because it is so much faster and helps with less slippage, I lay it around the border of the cotton or flannel fabric and one piece down the center.

After Laying it down I peel off the top non stick coating on the tape and simply press the Ruffle Blanket Binding onto it going around the whole blanket.


I leave the edges open without any stitching and not pressed onto the fabric so I can sew the binding together


 |
| Binding turned right side out |
 |
| Pin in place to hold |
Using the Wonder Tape again I once again go around the border of the blanket on top the Ruffle Edge (about 1/4 inch from the fabric edge) and peel of the top non stick layer when done.

We are almost there! Taking the minky fabric I lay it down face up and take the cotton panel with the ruffles and lay it face down on the minky and press down firmly along the borders where the wonder tape is to make sure it sticks firmly.
Then I pin about 6 inches apart on the bottom of the blanket to mark where I start and stop - so I can leave an opening to turn the blanket right side out when I'm done sewing the seam.

 |
| Walking Foot |
Using my WALKING FOOT (very import to use this, otherwise the fabric will slip) I stitch 1/4 inch seam. I start at the bottom pin and sew until I get all the way around the blanket to the top pin, so as to leave about a 6 inch opening.

Using my Grid Ruler I line it up with the edge and cut off all the excess minky. Except at the 6 inch opening where I leave an extra half inch.

 |
| Extra half inch at opening |

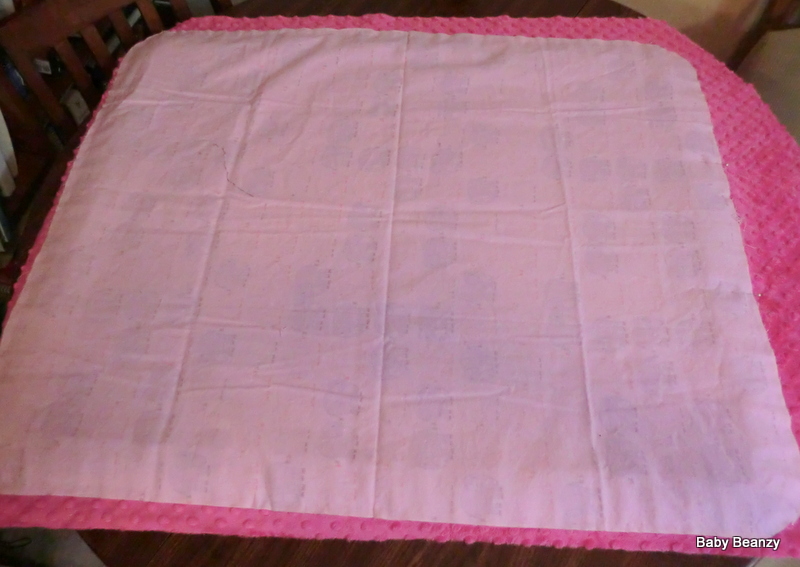
Turn the blanket right side out using the 6 inch unstitched space and tuck the unstitched edge under and pin.

 |
| Also check the backside and make sure everything is tucked neatly into place. |
Finally, topstitch about 1/8 from the edge and your done! (Don't forget to throw it in the wash to remove the Wonder Tape) You now have a beautiful boutique style Ruffle Baby Blanket. Enjoy!

Friday, September 28, 2012
Wow!!! You have 2 under 2, how do you do it????
When I found out I was pregnant with my now 7 month old daughter Ava I just couldn't believe it. I had just recently stopped nursing my then 8 month first child McKenna and thought how could this be, I'm still getting used to the idea of being a mom! After the initial shock wore off, the panic set in. All I could think of was how there was no way I was going to be able to handle this. Babies require so much attention, I'll never survive, when will I sleep? Slowly the panic subsided, although I still worried how I was going to handle what I considered 2 babies and excitement over a new child began.
While in still in panic mode I began to search the internet for whatever information I could find on the topic of parenting 2 under 2. I came across a website that called it "Baby Bunching". While most of these women had decided that having their kids as close together as possible was optimum, which was not the case for me, I began to see the benefits of having closely spaced children.
Fast forward to now, my first child has just turned 2 and my second is now 7 months and I no longer have 2 under 2, though I am still part of the club. Although I have not been a mom for more than 2 years and most certainly have no idea of the challenges older kids bring I do feel that I have passed the "Hump" of the intensity that a new baby and a barely toddler bring. Recently I have run into some other moms who have either just entered or are about to enter this zany club and have asked me "How do you do it?" The same words that only 7 months ago were coming out of my mouth. I will preface this by saying that I am certainly no expert and every child is different but I do know what has worked for me and friends of mine so I have decided to sit down and tell you what I know.
The first couple of months I was lucky that my husband stayed home the first month and that my step-grandmother came to stay with me a week. I believe having the support of my family during this crazy transition made it all that much easier.
First off the majority of the daily care for my toddler transitioned to my husband during this time while he let me nurse, sleep, and change diapers in that rapid cycle that newborns have. He began to wake up with McKenna in the morning, get her milk and breakfast and let me sleep undisturbed until the baby and I were rested enough to get up. He also began to put her down for naps, give baths, and lastly put her to bed at night. After he went back to work I resumed all of these with the exception of bedtime which is now their time together.
I remember when the day came when I finally had to do it all myself and how scared I was but I learned how to juggle along the way and these are my tips to pass along.
1. The boppy is your friend! There is a lot that you can do that requires hands and nurse at the same time. For instance, when I sat down to have lunch at the table with my starving baby I simply put her on the boppy as she nursed while I ate my lunch at the table and helped feed my toddler next to me.
2. A baby carrier is a MUST! There is too much to do that you need your hands for that carrying the baby is the only way.
3, Getting out of the house has its challenges but it can be done. I would know, when I had my second one my first had only been walking 1 month and was still not an actual "walker", not to mention that I lived in an upstairs apartment. How was I ever going to leave the house? Well, I packed the newborn in the baby carrier and popped the toddler on my hip and down the stairs we went. Then the toddler either stood by the car or I somehow managed to get her into her carseat and then I put the baby in hers. I kept the baby carrier strapped to me while I drove and was ready to pop her back in it as soon as we got to where we were going.
4. Going to Parks: Pick a park that you can easily pull the car up near the playground so yo don't have to far to walk and is well enclosed. And once again, USE the baby carrier. That way I never had to walk off and leave the baby in the stroller if my toddler was running off.
5. Go to the grocery store when my husband is home. That way I can get all my shopping done with no distractions, have a little time by myself, and he gets to experience what I call "The Zaniness".
6. If I can't get to the park or out of the house that day, I wait until my husband gets home and let him watch the baby while my toddler and I go out for a walk. Its some alone time for him and the baby and some for me and my toddler where I can actually keep up with her trying to dart in all directions and have a little fun just the two of us.
7. Bath time! I pop my toddler in the bath with me and then have husband come and switch her and the baby and then all 3 of us are clean at one time.
8. Dress everyone and change everyone's diaper at the same time.
9, Feed everyone (once baby is on solids) at the same time.
10. Morning seems to be the best time for me to get done things I want to do (like computer time), both kids are in a good mood and are entertained easily.
11. Since for me it takes longer to get baby to sleep at nap time (or bed), I give her something to play while I get my toddler to sleep and then take my time getting baby to bed.
12. Ultimately someone's going to have to fuss a little and its okay. I can't be in two places and make everyone happy at one time, and for goodness sake I have to use the bathroom sometime!
13. Finally I just try to remember that all this controlled chaos is part of the fun! Its louder, its crazier, someone is probably fussing, but I can't remember my life before this and all the joy they have brought me.
And if none of this works, as my friend says "BREATH - it will be over soon."
Sunday, September 23, 2012
Who doesn't love My Little Pony!
One of my 2 year old daughter McKenna's favorite books has been the My Little Pony board books that I picked up at Dollar Tree when she was still a baby. They brought back memories from my childhood and how much I absolutely LOVED all things My Little Pony. My cousin and I even shared a My Little Pony House for our ponies that we would spend hours playing with. So years later when I saw these cute little books I grabbed them. My daughter loved them from the beginning. I think it was the bright colors and pretty pictures and needles to say she had no idea what the story was about so I just made things up. Now that she is 2 she still loves for me to read the books to her, this time as they were written.
While perusing the internet for some ideas for a top I wanted to sew for the girls I came across this great tutorial making the cutest My Little Pony-esq Costume. I absolutely love it so much and just wanted to share this with all of you!
It is called the Rainbow Dash Costume made by Jessica over at Craftiness is not Optional. Also take a look at the cute little Board Books.
Please check it out! I know I will be making this cute little costume for my little girl!
Saturday, September 22, 2012
Whats a Mommy Blogger?
Spending all day surrounded by my two girls, now 9 months and 2 years is lots of fun, unfortunately I don't have much to talk about except the crazy stuff that goes on around my house. Usually I post this as one liners on facebook annoying all my friends who either don't have kids or just don't care. For example my posts the last 4 days have been about the amazing feat of my 9 month old Ava getting her first 4 teeth in a record breaking 4 days! Quite amazing in my book and anyone who has gone through the lovely experience of teething. While my posts are usually quite entertaining I can see how many of my friends make comments about people who only talk about their kids. But honestly - this is my life, lol. So while in a facebook conversation with a friend who also has a little one and is usually laughing at the ridiculous updates I post about my kids, she commented that I should be a "Mommy Blogger". A What? I didn't even know what a "Mommy Blogger" was or that they even existed. I just started my blog with the intention of sharing some sewing tips and such. I completely dismissed this not really having a clue what she was talking about. After a month or so during my never ending quest to find fun tutorials and how to's on the internet to sew stuff that I like I realized many of the sites I was visiting were crafting "Mommy Bloggers". I also began to look at all my funny posts on facebook and realized how much funny stuff I have to talk about that other moms could identify with. The wheels started turning and I realized how much fun it would be to share all the cuckoo crazy that goes on in my life with all the other mama's out there who are crafty mama's being entertained by their own cuckoo crazy. So here it is- I realized essentially I have been a facebook *Mommy Blogger* this whole time! Now that I have discovered this I have so much fun stuff to share. My new mission: *Mommy Blog* away!!!!


Ava - what a week - 4 teeth and up on all fours!
Wednesday, August 15, 2012
Win a beautiful Lovie/Security Blanket
This Weeks Giveaway Prize is a 18x22 Satin-Trim Lovie/Security Blanket! Great Fabric Choices of Laurie Wisburn's Jack n' Jill Donkeys in Rain Boots or the beautiful Lilly Belle fabric by Bari J. Ackerman. To enter you can scroll to the bottom of the page or enter here on facebook:
https://www.facebook.com/BabyBeanzy/app_228910107186452


Friday, August 3, 2012
Baby Beanzy Week 2 Giveaway Update!
Bibs, Bibs, Bibs!!!! Week 2 Baby Beanzy Giveaway!

2nd Choice for the Bib Set Giveaway is this stunning Karavan Collection by Valori Wells. Some fabulous baby will get to wear these! If you want to enter be sure to click the link below or scroll to the bottom of page to enter.
https://www.facebook.com/BabyBeanzy/app_228910107186452
Subscribe to:
Posts (Atom)